Hi Everyone, Want to shorten the cooking time for some dishes without losing the flavour? Want to cook okra that’s not slimy? Do you want to cook shrimp with vegetables and not let them turn into little bits of rubber? Read on then as I share with you some everyday tips I use in the kitchen that always work for me. I’m sure they’ll help you too.

Non-slimy sautéed okra – You want to start by first ensuring that the okra is at room temperature and dry. What this means is that if your okra has been in the fridge, take it out and let it come up to room temperature, this will take at least half an hour. The okra will spring beads of water as it warms up; therefore, it is important to pat the okra dry removing the excess moisture before slicing. Of course, you can skip this step altogether if you are using the okra you just brought home from the farmers’ market.
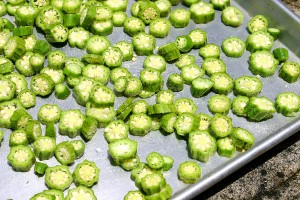
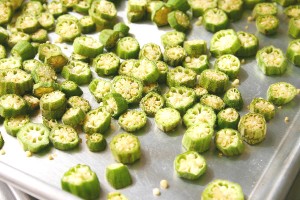
Next, slice your okra into quarter-inch rounds, spread on a baking sheet or large tray and place in the sun to dry for at least 30 – 45 minutes. By placing the okra in the sun, again, moisture is being extracted and this will result in your okra not being slimy when cooked. If there’s no sun where you are then leave the okra in a warm place on your counter top for at least an hour to an hour and 15 minutes to air-dry.

When it comes to salting the dish, wait until the okra is done cooking, then add the salt and stir. Salt usually extracts moisture, so adding it to the end of this particular dish, prevents it from yielding any moisture.
Non-pasty and less bitter karaila (aka bitter melon/gourd) – One of the reasons many people don’t like this vegetable is because of its bitterness and it is also for that exact bitterness that many people love it. However, here’s a way to prep this ingredient that will be effective in introducing someone to this vegetable.
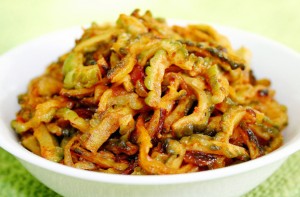
For sautéed karaila, once the vegetable has been de-seeded and sliced, place in a bowl and sprinkle liberally with salt. You can opt to place the bowl over a colander to catch the juice which can be drunk as bitters to cleanse your body. Let the salted karaila stand for at least half an hour, the longer it stands more of the bitter juice will be extracted. Remember what I said above about salt extracting moisture.

Taking the sliced karaila one handful at a time, squeeze it tightly using both hands to extract as much of the juice as you can. You can then rinse it in water and do a second squeeze to extract some more juice but this is not necessary. Spread the squeezed karaila onto a baking sheet or large tray and place in the sun to extract some more of the moisture. Half an hour is good enough time. Drying the karaila will allow it to be cooked without sticking together because of excess moisture.
When cooking, you should not need to add salt to the karaila as it would have retained enough salt to taste from when you first salted it to extract the bitterness.
Chowmein with vegetables and meat throughout – For years I was frustrated just like many of you with the vegetables and meat in my chowmein being at the bottom of the pan or my plate. The key to preventing this from happening is to cut the vegetables and meat lengthways and in strips, this is to match the shape of the noodles. By cutting the ingredients this way, everything gets interwoven throughout the dish, so that when we take our forks and twirl, we get the noodles, some veggies and pieces of meat.
It’s the opposite with fried rice, the meats and veggies for this dish should be diced small so that it mixes and incorporates well and also suits the smallness of rice.
Peeling green bananas – If you like cooking green bananas but hate the difficulty of peeling them and the stickiness, then boil them first and you’ll find that peeling is as easy as pulling the skin off of a ripe banana.
Boiling water – Most of the time when I am cooking, there is a kettle of boiling water also on the stove. This cuts my cooking time for certain dishes down by at least half. For example, if I am making a curry, once the meat or chicken has finished sautéing with the paste, I add boiling water to continue the cooking process immediately. That way, the ingredients are not cooled down and then have to take time to be heated through and come to a boil. The same goes for some stews.
When boiling rice, if more water is needed, I add boiling water instead of tap water, this way the rice continues to boil and not cool down, lengthening the cooking time before it returns to a boil.
If I am making a vegetable rice dish, whether I am using water or stock, it is always heated when added to the pot. With cook-up rice, once the coconut milk is squeezed, I place it on very low heat so that when I add it to the pot with the rice, peas and meats, it comes to a boil quickly. This technique prevents the constant stirring that some people feel driven to as they wait for the pot to come to a boil.
Cooking bora (aka snake beans, yard-long beans) – These beans take a while to cook. Some cooks add water to get around this problem, but you don’t need to do this. Once you’ve sautéed your aromatics, added the bora to the pan, and stir to mix, cover the pan and reduce the heat to simmer and let the bora cook in the steam created from the covered pan for 15 – 20 minutes (depending on how much bora you are cooking) and for the last five minutes, remove the lid so that any moisture remaining can be dried out.
Cooking vegetables with shrimp – In Guyana in particular, vegetables are often cooked with baby shrimp; however this tip applies also to cooking larger shrimp with vegetables. A friend of mine once complained that she does not like to cook her vegetables with shrimp because the shrimp get rubbery and tasteless. They end up tasting like little erasers – chewy. I was so happy to share this tip with her which I learnt from my mom some time ago. Here’s what to do. Once the shrimp is washed clean, transfer it to a big sieve and let it drip the excess water, use a bowl to catch the liquid and discard it.
Once this is done, line a plate with some paper towels, spread the shrimp on the paper towels and then place another set of paper towels on top, to blot and absorb the water. It is important that you get a lot of the moisture out so that the next stage is effective.
Heat a little oil in the pan in which you plan to cook the dish. Let the pan be smoking hot. Add the shrimp and toss it around for no more than a minute and then with a slotted spoon, remove the shrimp from the pan, place in a bowl and set aside. Proceed with the cooking of your aromatics and the vegetables. About 2 minutes before your dish is done, add the shrimp back to the pan and stir to incorporate, do not add any liquid that might be in the bowl where the shrimp was resting. To do so will add to the cooking time of the dish, and it is likely to lead to that awful eraser-chewiness.
Cooking is about learning and making note of what works and does not work for you, that’s how we come up with tips. I’ve also found one of the great sources for cooking tips is watching other people cook, seeing how they do things and asking questions. And don’t assume that you cannot learn anything from people who do not cook often, you’d be amazed at the shortcuts and ways they have devised to get themselves in and out of the kitchen in no time.
Why not share some of your cooking tips? Leave your tips in the comment section of the column online, or visit me at www.tasteslikehome.org or drop me a line directly at tasteslikehome@gmail.com
Cynthia
tasteslikehome@gmail.com
www.tasteslikehome.org


