Hi Everyone,
I like to hear what people’s favourite dishes are. Sure, sometimes I get to hear about new meals I might like to try, but often it gives me a little more insight into my friends and the people I meet daily.
 One of my best friends loves bread. Yes she is one of my tasters and enjoys the taste excursions I try to take her on, but when it comes right down to it, when I ask her what her favourite food is she will answer “bread.” I decided to sit down with my friend (I call her the Breadologist) and find out more about this deep love she has for bread. In other words, it was time for some Breadology 101.
Now I have to be honest, I was not at all surprised when my Breadologist buddy told me that her favourite food was bread. I have often been witness to her enjoyment of all things bready. I remember a couple of times going to the supermarket with her. Among her groceries would usually be two French baguettes, however only one would make it all the way home. She could never resist the smell of the fresh French baguette as it filled the car. Even with the windows down the temptation would be too much and so she would break off a little piece, then break off a little more, then a little more until it had all disappeared and all that was left were the tell-tale crumbs on the car seat.

But this baguette story tells you a little bit about what the Breadologist loves about bread. She said the smell of bread was just so warming for her. It made her feel so good. We talked at length about food aromas. Whenever I write this column I try to convey the way the dishes I make smell. It is not always an easy task because there are only so many words that can capture all the wonderful things that aroma does to our taste buds. Plus aromas are not only about the anticipation of what we are going to eat. They are also about the memories that they conjure up for us. For example, my friend the Breadologist told me that for a portion of her childhood she lived near a bakery. She remembered walking home from school and as she got closer and closer to her house the smell of the bakery would be there – not overpowering, but present nevertheless. She remembered the first time she invited one of her school friends to her house. As soon as the pal entered the living room she started sniffing the air and declared, “someone’s making toast.” It wasn’t toast it was the bread smells wafting across the air.
Further investigations with my Breadologist buddy revealed that the tactile sense of bread was as important as the taste and smell of it. “I love the way bread feels in my mouth,” she told me. Though she is certainly a fan of sliced bread, she said that there are few things better than breaking off a piece of bread with your hand, and then chomping down on it. With a good artisan bread, your mouth gets to revel in first the crunch as your teeth bear down on the crust and then the softer insides of the bread. Then you chew and chew, swallow and your tummy says, “Why thank you so much!”

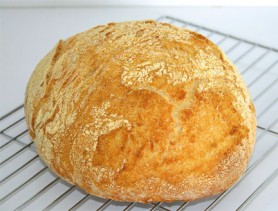
You might remember when I made the no-knead bread a while back, my Breadologist friend was very happy to be a taster that day. When I started baking, the aroma took over the whole house and the crust on the no knead is quite crunchy while the centre is really soft. So it really fulfilled all of her breadology requirements.
I think there is something special about when somebody enjoys something. Whatever it is, whether it is food, or a favourite television show, or a movie, when our friends love something, that love can be infectious. I know that in the past that has been the case with me and the Breadologist. I was never a huge fan of bread. Sure I liked it, but I wasn’t the super duper fan my friend was. I enjoy baking bread more than I do eating it. However, one time, when I was visiting her in the United States she took me to the deli that was close to where she lived. It was there that she introduced me to Ciabatta bread (an Italian bread). I was hooked.
For the entire time of my visit we would manage to pop into the deli to try and get that Ciabatta, so that we could enjoy it as sandwiches for lunch or with a nice cup of Earl Grey tea for breakfast. Often we were disappointed. By the time we got to the deli all of the Ciabatta had been sold. This could not go on, so we talked to our dealer…uh, I mean the lady at the deli counter. She told us that there was a special schedule for delivery of the bread and if we were going to ensure we could get our Ciabatta fix we would have to get to the deli at special times. But then she told us something even more important. The deli got the bread from a bakery just one town over. It was not very far away and soon we had a direct line to satisfy our Ciabatta needs.
Now, my infatuation with Ciabatta didn’t last much longer than my visit. As I said, I’m not the hardcore Breadologist my friend is. By the time I got back home to Barbados I was satisfied with the occasional Bajan salt bread. But my friend eventually moved to that other town, the one with the bakery. Oh she might tell you it was because she was able to share a house with another great friend of hers… but I’m not so sure.
Cynthia
tasteslikehome@gmail.com
www.tasteslikehome.org
No-Knead Bread
(Jim Lahey)
Yield: 1 loaf
Ingredients
3 cups all purpose flour, plus more for dusting
¼ teaspoon instant yeast
1 ¼ teaspoons salt
1 ½ cups tap water
Cornmeal as needed
Equipment
1 large bowl
Plastic Wrap
2 large cotton tea towels
1 (6 – 8 qt) heavy pot with cover (cast iron) or use enamel, Pyrex or Ceramic
Method
1. Add flour, yeast and salt to a large bowl and mix thoroughly.
2. Pour in water and stir until well blended; the dough will be shaggy and sticky. Cover the bowl with plastic wrap. Let dough rest for 12 hours – 18 hours (the dough is ready when the surface is dotted with bubbles, so check at the 12-hour mark).
3. Flour a work surface and pour the dough onto it. Sprinkle a little flour onto the top of the dough and fold it over once or twice (you are folding, not kneading). Cover loosely with plastic wrap and let rest for 15 minutes.
4. Meanwhile, generously coat a tea towel with cornmeal and set aside.
5. Using just enough flour to prevent the dough from sticking to the work surface or your fingers, gently and quickly shape the dough into a ball. Place the shaped dough onto the cornmeal-coated tea towel, seam side down; dust with some more cornmeal. Cover with another cotton towel and let rise for 2 hours or until doubled in size.
6. Half an hour before the dough is ready, heat oven to 450 degrees F. Put pot or dish with cover in the oven as it heats. When the dough is ready, carefully remove the pot from the oven, remove the lid and set aside. Slide your hand under the towel and turn the dough over into the pot, seam-side up; it may look like a mess but don’t worry, it’s okay. Shake the pot to evenly distribute the dough (it will straighten out as it bakes). Cover with the lid and bake for 30 minutes, then remove the lid and bake for another 15 – 30 minutes or until the loaf is nicely browned.
7. Cool on a rack. The bread will make delightful crackling sounds as it cools.
White Bread
(Nigel Slater)
Yield: 2 loaves
Ingredients
2 lbs all purpose flour, plus extra for dusting
3 teaspoons instant yeast
1 ½ tablespoons salt
3 cups lukewarm water (approximately)
Equipment
1 very large bowl
1 large baking sheet
Plastic wrap
1 large cotton tea towel
Wire rack
Method
1. Add flour, yeast and salt to bowl and mix.
2. Pour in enough water to mix to a sticky dough; knead and the dough will become less sticky, then dust lightly with flour and keep kneading. You want the dough to be soft and springy and still slightly sticky to the touch.
3. Flour a work surface, pour dough on to it and knead dough gently for 6 – 8 minutes.
4. Oil the bowl you were originally working in and return the dough to the bowl. Rub the top of the dough lightly with oil. Cover with plastic wrap and place in warm place to proof for 1 ½ hours or until the dough has doubled in size.
5. Flour your work surface again and pour the risen dough on to it. Knead for 2 minutes. Cut the dough into half, shape into balls and place on a large, floured baking sheet (not close together). Sprinkle with a little flour, cover with tea towel and let rise for an hour or until doubled in size. The dough would have risen and spread a lot. Very gently tuck in the sides to make a neat high ball.
6. Preheat oven to 500 degrees F and bake bread at this temperature for 10 minutes, then reduce heat to 425 and bake for 25 minutes or until the loaf is brown and the bottom when tapped sounds hollow.
7. Cool on a wire rack and wait for at least 20 – 30 minutes before cutting.

