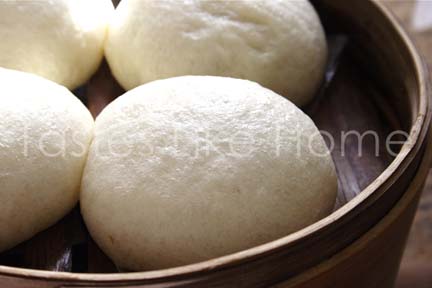
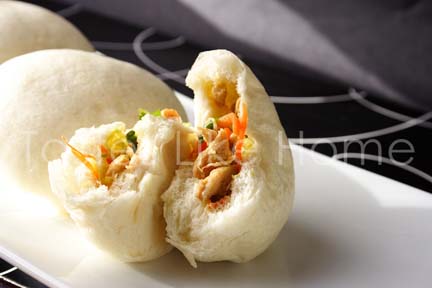
As I bit into a Pau I made yesterday, I was filled with a range of emotions – happiness because I had successfully re-created something I had loved as a child. Sadness because many of the people associated with the memory of eating Pau have gone to the great beyond, and a feeling of emptiness because the place I associated with Pau, and so many of my childhood memories, Sacred Heart Church, was razed to the ground more than 5 years ago.
 Back in the day, in order to assist in the raising of funds for renovations to be done to the church, there would be weekly cake sales that would take place each Saturday morning in the foyer of the then Royal Bank of Canada on Water Street. It was more like a bake sale because there was always a lot more than just cakes on sale. I would go with my mom, Granny Harris, Auntie Olga and Auntie Enid some of the “the chief cook and bottle washers” of the bake sales. Granny Harris and Auntie Olga have since died, they and all the other ladies raised quite a bit of money from those sales at the bank. The bank used to be open on Saturday mornings and so there were always customers going in and out and of course, the bank tellers and managers all patronized our stall.
There were certain items that always arrived early and then there were those that would be delivered a couple of hours later, and one of those items that was always delivered later was the Pau. I also noticed that the Pau rarely made it to the table for sale to the public, the women manning the stall usually bought it and some would be packaged for regular customers who would have pre-ordered. The Pau was special; it was always in demand and demand outweighed supply.

Pau is a type of Chinese steamed filled bun that’s served as Dim Sum. Pau can be eaten at breakfast or at any time. The fillings are varied; they can be filled with beef, pork or chicken, bean paste or vegetables.
My mom always ordered Pau for us whenever it was available, and what a treat that was. Of all the treats my mom would buy for us at the bake sale, I always prized the Pau because the other things I’d usually get at home because mommy would make them, but the Pau, uh uh, that was different, that was special. I used to marvel at the delicacy of the dough and the filling was always a delight, most of the time it was filled with chicken and vegetables. I never dreamed that one day I’d be able to make such a thing.
Fast forward to present day. I’ve been wanting to try making Pau now for several months but my research for recipes indicated that the Pau is usually made with a special flour – Water Lilly Flour, also known as Hong Kong Flour or Pau Flour. Given that I cannot locate that flour here in the Caribbean, I felt doomed. No Pau for me.
Then in December, a blogger friend of mine posted a recipe for Pau along with the photographs of what she had made and they looked exactly like the ones I used to have as a child! I the read the recipe and immediately noticed that she indicated that all-purpose flour could be used in place of the special Pau flour! Oh yeah! I bookmarked the recipe and filed it away to be made on a day when I have some time to devote to the process. Well that day was yesterday.
I was so moved when the Pau turned out exactly as I remembered them tasting and feeling so soft and gentle between my fingers. I looked at it for a long time before I took that first bite…
Chicken Pau
(Adapted from Ian-ieza@MyR)
Yield: 20
INGREDIENTS
For Dough:
2/3 cup warm water (110 – 115 degrees F)
1/3 cup granulated sugar
1 tablespoon instant or active dry yeast
2+¼ cups all-purpose flour
1/8 teaspoon salt
½ teaspoon baking soda
½ teaspoon canola or vegetable oil (plus extra for rubbing dough)
1+ ¾ tablespoons vegetable shortening (3/4 oz)
For Filling:
12 oz thinly cut chicken breast
1 teaspoon grated ginger
1 teaspoon grated garlic
¼ teaspoon toasted sesame oil
¼ teaspoon pepper sauce
2 teaspoons soy sauce
1 tablespoon vegetable or canola oil
1 cup shredded carrots
1 cup shredded Savoy cabbage (crinkled leaf cabbage)
½ cup sliced green onions (white & green parts)
Salt to taste
Equipment
2 medium bowls
1 tablespoon
1 large bowl, rubbed lightly with oil
Plastic wrap
1 rolling pin (preferably small)
20 (3 x 3-inch) square cut parchment paper or wax paper
2 large baking sheets or platters
1 wok, large karahi or large pot with cover
Bamboo Steamer or metal steamer
1 flat spatula
DIRECTIONS
For Dough:
1. Add sugar and water to medium bowl and stir to dissolve sugar. Stir in yeast (use your fingers to remove any yeast stuck on the spoon). Cover and let proof in a warm place for 10 minutes.
2. Add flour, salt and baking soda to large bowl and mix thoroughly.
3. Create a well in the centre of the flour; pour in the ½ teaspoon oil along with the proofed yeast mixture (scrap the bowl to get everything). Mix together; as soon as the liquid is incorporated (dough will still be crumbly), toss in the vegetable shortening and knead to make a dough (depending on where you are you may need to add a little more water but be careful not to make the dough too wet. Turn the dough on a work surface and knead for 5 minutes. It is important that the dough be kneaded for this time so that the gluten can develop and give the cooked dough the desired lightness and texture when cooked.
4. Rub the dough with oil and transfer to oiled bowl. Cover with plastic wrap and let rise in a warm place for 1½ to 2 hours or until dough has doubled in size.
For Filling:
The filling needs to be cooled so make this as soon as you’re done kneading the dough and setting it to rise.
Add chicken, ginger, garlic, sesame oil, pepper sauce and soy sauce to medium bowl and toss to mix. Let marinate for at least 30 minutes.
Heat oil in wok or karahi until almost smoking; toss in chicken and spread out in a single layer, let cook for one minute and then toss and spread out again to cook for another minute our until fully cooked. Remove from pan and set aside to cool completely.
Add carrots, cabbage and green onions to cooled chicken and toss to mix. Taste for salt and adjust if necessary. Set aside filling.
Assembling:
1. Punch down risen dough, knead for a minute or 2 and let rest for 10 minutes.
2. Cut dough in half and then cut each half into the small pieces about the size of a tennis ball. I weighed mine and each was 1.2 ounces (35 grams). Form into balls.
3. Take one piece of dough (cover the rest while you work so that the dough does not dry out. Using your finger, press the dough into a circle and then roll into a 3-inch circle on a work surface getting the ends thin and the middle thick.
4. Cup the rolled dough in your hand and spoon in 1-heaped tablespoon of filling. Use the thumb of the hand in which the stuffed dough sits to gently press down the filling while you use your other hand the pinch the dough and seal in the stuffing. Ensure that the stuffing in secure. Rub a little oil on the stuffed pau and place on a piece of parchment paper or wax paper and place on baking sheet. (If using wax paper, brush the paper with a little oil as this helps prevent sticking after the pau is steamed). Continue rolling and stuffing each piece of dough until all is done. Cover baking sheets loosely with plastic wrap and leave dough to rise. This can take anywhere from 30 – 45 minutes to an hour. I let mine rise for an hour.
5. Add water to karahi, wok or pot and bring to a roaring boil. Working in batches, add the risen pau to the bamboo steamer (handle gently, you don’t want to deflate the pau), cover the steamer and transfer to wok or karahi. If using a pot with metal steamer, add to pot and cover and let steam for 10 minutes.
6. If you are using a bamboo steamer, remove from wok/karahi after the 10-minute cooking and wait 7 – 10 minutes before opening lid! If you are using a regular pot with a steamer, remove pot from stove and wait for 7 – 10 minutes before removing cover. Transfer cooked pau to trays and let cook while you continue to cook the rest.
7. Serve warm or at room temperature.
8. Pau can be stored in airtight containers in the refrigerator. Re-steam until hot to serve.
Cynthia
Cynthia@tasteslikehome.org
www.tasteslikehome.org


