Hi Everyone,
There are 3 men in particular who read this column and comment every week. Their handles are: Observer, CAG and Al Fernandes. The comments are full of humour, history, nostalgia and bantering. For me, it is always an education reading their comments. Thanks fellas and keep the gyaff going.
Last week when I wrote about Another Easy Bread, the conversation quickly turned to the kinds of bread Observer, CAG and Al like to eat with their Pepperpot. For many Guyanese, the standard of excellent bread is measured by its ability to be eaten with Pepperpot. First there is the break-ability of the bread; there should be no slicing involved. You want to be able to break, tear and pull off a good hunk of the bread. The crumb (the inside or white part of the bread) has to be tender enough so that when you dunk it into the Pepperpot, it sucks the sauce good and proper. The bread must be heavy with sauce as you bring it to your mouth. And when you bite down on the bread, the sweet-spiced sauce is squirted to all parts of your taste buds; the bread becomes a soft chew. Gosh I suddenly feel like eating Pepperpot and bread! Al boasted of his mother’s baking exploits every Saturday afternoon “…in de mud oven next to the kitchen downstairs.” Now living in Florida, he says that nothing else would suffice, “Except maybe, a Jamaican Hardo-bread every now and again.” I thought to myself, well if the Jamaican hard-dough bread is up to Al’s high bread standards then it was certainly a bread worth trying.
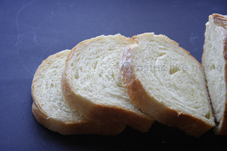
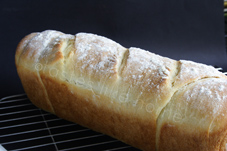
The Jamaican hard-dough bread is so called for a variety of reasons, chief among which is that it is a solid, sturdy bread – one that’s great for sandwiches and other fillings that might be moist. It does not breakdown and get soggy easily. When you have a couple slices of this bread, man, you feel alright. You’ve just had some proper and filling bread.
 The hard-dough bread is the go-to table bread in Jamaica. According to various sources, the Chinese introduced the hard-dough bread to Jamaica. It is another example of how the food we eat in the Caribbean is influenced, and then made our own, using available ingredients, certain tools and equipment and techniques. Made with cold refrigerated water, this hard-dough bread does not require a lot of yeast and the proofing/rising time is short – 40 minutes. The cold water that slows the growth of the yeast and the short fermentation time is what makes this a hard-dough bread. The result is a compact bread.
It is a forgiving bread. Now what do I mean by that? The recipe called for the butter to be cut into the dough, such as one would do for pastry. I measured and assembled the ingredients. I had put the butter back into the refrigerator as I went about gathering the other ingredients. You are probably guessing by now what happened. I kneaded the dough without the butter. It was not until I was washing up that I saw the knife with which I had cut the butter that I realized the omission. Anyway, rather than fret about it I made the decision there and then to cut the butter into small pieces and roll it into the dough when it was time to shape the bread. That is what I did and you know what? The bread turned out great, with the bits of butter melted throughout the bread. Think Butterflap. The texture of the bread was just right!

Try the bread and tell me what you think, or post a comment on the Stabroek News website and tell Al and the others what you think of the Jamaican Hard-dough bread.
HARD-DOUGH BREAD
(Adapted from The Real Taste of Jamaica)
Yield: 1 loaf
INGREDIENTS
1 lb all-purpose flour
1 teaspoon instant dry yeast
2 tablespoons white sugar
1 teaspoon table salt
1 oz cold, unsalted butter, cubed
1 ¼ cups refrigerated cold water (see direction # 3)
 DIRECTIONS
1. Add flour, yeast, sugar and salt to a large bowl and mix well.
2. Cut in butter to flour mixture.
3. Add water and bring together the ingredients to form dough (add a little more water if you find that there is still a lot of loose flour and bits in the bowl).
4. Dust a work surface with flour, transfer dough from bowl and knead for 15 minutes until dough is pliable. Dust the work surface and your hand with flour intermittently if necessary.
5. Oil a large bowl and the dough (you can use the same bowl in which you made the dough). Transfer the dough to bowl, cover with plastic wrap and place somewhere warm to proof/rise for 40 minutes.
6. Grease a loaf pan (9 x 5)
7. Lightly dust a work surface with flour, transfer dough to work surface and using a rolling pin, shape into a long rectangle (about 8 inches wide and 18 inches long).
8. Working from one end (lengthways), roll the dough as tightly as possible to the other end. Place the dough seam-side down into the greased loaf pan, cover and let rise in a warm place for 40 minutes. After the first 20 minutes, preheat the oven to 375 degrees F.
9. Transfer bread to oven and bake for 25 – 30 minutes or until the crust sounds hollow when tapped.
10. Remove bread from oven and let rest in pan for 5 minutes before transferring it to a wire rack to cool.
11. Serve warm or at room temperature.
NOTE
To make 2 loaves, double the recipe ingredients.
If you like, dust the bread with flour and score if before placing it in the oven.


