(Brazilian Cheese Bread)
Hi Everyone, Is it bread, a bun or a roll? Does it really matter? Especially when you can’t seem to stop yourself from eating at least 3 at one go?
One of the many things I like about South American cuisine is the abundant use of root and tubular vegetables. The myriad ways in which these ingredients are prepared provide so many options for eating well and eating local. We don’t have to look far to find something different to make with familiar ingredients, all we have to do is turn to our neighbours too. While some of us (countries) share several similarities in terms of various colonial histories, it is interesting to see and taste how those influences are mixed and matched.
Brazil’s food culture, like ours, is a mixture of influences. However, there are three particular points of reference when it comes to Brazilian food – Europe (particularly Portugal), Native American (Indigenous Amerindian) and Africa. Pão de queijo (pão di KAY-ju), a very popular cheese bread/bun/roll in Brazil draws its influence from Europe but it is unequivocally made with ingredients that are very much a part of the Indigenous Peoples and African food cultures. This confluence of ingredients and food influence makes pão de queijo definitively Brazilian.
 The main ingredient for pão de queijo is cassava starch, not to be confused with cassava flour which is a more coarsely ground version. Cassava is known by various other names such as yucca, mogo, manioc and tapioca. There is a species of cassava that is native to Brazil, which was spread by Portuguese and Spanish explorers to Africa, the Philippines and most of parts of the Caribbean. It is this variety of cassava that is ground into a flour/starch and used in a variety of ways in Brazilian cuisine. The cassava starch there is sold in two forms – sweet and sour. The type used to make authentic pão de queijo is the sour version, which is a fermented from the sweet cassava starch. The acidity is what gives the cheese bread/roll its signature taste.
Pão de queijo is said to have originated in the Minas Gerais state in Brazil, known as the land of milk and cheese. Very appropriate, don’t you think? Along with the sour starch, the original recipe also calls for a tangy, flavourful aged farmer’s cheese made of raw cow’s milk – Queijo Minas. Actually this cheese is so important to the cuisine of Brazil that in 2008 the Brazilian Institute for National Historic and Artistic Heritage declared it a Brazilian Immaterial Cultural Heritage. Think Parmigiano-Reggiano and Prosciutto de Parma of Parma, Italy, which are ingredients classified as protected designation of origin.

Sour starch and tangy cheese come together to make a treat that is enjoyed any time of the day. Savoury and gluten-free with its warm chewy centre, pão de queijo is sure to win you over. Elisa Teixeira, a scholar and chef who hails from the Minas Gerais state of Brazil says, “People eat pão de queijo any time of the day when they feel hungry or when they are not in the mood for a whole meal. When I was a child growing up people used to serve them at wedding parties with thinly sliced pernil (roasted ham) and maionese de legumes (Brazilian-style potato salad).”
According to Elisa, if I want to taste authentic pão de queijo, “You’ll have to visit Minas Gerais… you won’t regret it, I promise!” Well, until I can get there, I thought that I would experiment a little with ingredients that I have around me. Based on the results and the responses from the taste testers, we may not have the real thing but what was created is definitely a winner. I made an adapted version and took them to a get-together last year and they were the first things to go and there were requests for the recipe. This past week, I made another batch of my adapted version of pão de queijo testing a different kind of cheese and gave it to a friend. My friend took it to a dinner get-together to be used as the bread to start the meal and they were gone in no time and yes, more requests for the recipe.
There are two recipes here. The first one is Elisa’s recipe (printed with permission) using the genuine ingredients. If you have access to ingredients from Brazil or any supermarket that sells ingredients from Latin America (for those of you living outside of the region), definitely try to get the sour starch. Given that the cheese might be the most difficult thing to locate, feta cheese is a substitute that you can use.
The second recipe is my adaptation using ingredients that are more readily available. Ground sago or regular cassava flour can work.
Pão de Queijo
(Elisa Teixeira)
Blog: Authentic Brazilian Cuisine
Yield: 40 – 45
INGREDIENTS
½ cup vegetable oil
1 ¼ cups whole milk
2 teaspoons salt (more or less depending on the cheese being used)
1 lb Manioc sour starch
2 eggs, lightly beaten
1 cup shredded queijo da canastra (sub: 2 parts sharp cheddar cheese and 1 part mozzarella OR 1 part mozzarella and 2 parts parmesan cheese)
DIRECTIONS
1. Combine the oil, milk and salt in a saucepan. Heat to just below boiling point (watch closely when the mixture starts to rise).
2. Meanwhile, add the starch to a large bowl.
3. Pour the boiling mixture all over the starch and, using a wooden spoon, start stirring the dough.
4. When the dough is cool enough to be kneaded by hand (but still hot), add eggs and cheese and knead until it is very sticky and elastic, about 15 minutes (you will need a spoon or scraper to get it off your hands).

ground sago (Photo by
Cynthia Nelson)
Let the dough rest while you preheat the oven to 450 degrees F (it is very important that the oven is at a high temperature when you bake the pães de queijo; if they start to get too brown on the bottom before getting golden brown on top, reduce the temperature a little bit).
Oil 2 large baking sheet pans. Oil your hands with vegetable oil and form golf-sized balls with the dough. Place them 2 – 3 inches apart as they grow considerably when baked.
Bake for 15 minutes or until puffed and golden brown. Serve hot.
NOTE
At stage #6 you can opt to store the balls in zip bags and freeze, and bake right out of the freezer. Cooking time would be longer.
Pão de Queijo
(Adapted by Cynthia Nelson)
Yield: 25 – 27
INGREDIENTS
2 cups whole milk
½ cup vegetable or canola oil
½ teaspoon table salt
2 ¾ cups ground sago or cassava flour
2 eggs, room temperature
2 cups grated Parmesan cheese or 3 cups grated sharp cheddar cheese
DIRECTIONS
1. Preheat oven to 350 degrees F.
2. Line two baking sheets (13 x 18”) with parchment paper or lightly oil the pans and set aside.
3. Add milk and oil to a saucepot and bring to a boil over medium heat. Meanwhile, mix together the flour and salt in a large bowl.
4. When the milk comes to a boil, remove it from the heat and slowly pour it into the bowl with the flour, mixing with a pot spoon to form a dough. Or, you can choose to slowly pour the flour into the milk mixture, stirring to form a dough.
5. Mix in the eggs until they are fully incorporated into the dough (still using a spoon)
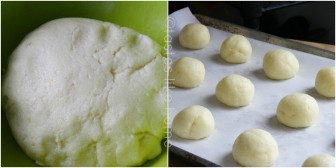
6. Add the cheese and mix until incorporated (initially with the spoon and then with your hands. If the dough is too hot to handle, let it cool just a little).
7. Lightly oil your hands and take the mixture a little at a time and roll into balls and assemble on baking pans.
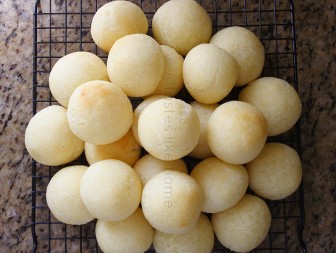
8. Bake for 15 – 20 minutes or until the balls are puffed up. If using Parmesan cheese, you will notice that they are cracked slightly at the top when baked. The balls do not get brown; they are almost cream in colour when done.
9. Transfer to wire racks to cool. Serve warm or at room temperature.
NOTES
The milk and oil mixture must come to a boil in order to create the kind of interaction needed for the dough to have the right consistency.
If you are opting to pour the flour into the milk mixture, then heat the milk and oil in a large pot so that you have enough room to mix the dough.
A sturdy wooden spoons works well for mixing or use a stand mixer if you have one.
The dough will be hot so don’t attempt to knead with your hands until perhaps when you add the cheese.
Cynthia


