Hi Everyone, This week we conclude the 2-part series on roast chicken. To quickly recap: we discussed in depth, ways to keep the breast meat moist, trussing (tying up) and seasoning the bird.
Cooking times and temperatures
Cooking times and temperatures is another area many people go back and forth on when it comes to roasting a chicken whole. The experts have their opinions on the best way to roast meats, what you have to keep in mind is that the decision is usually based on what works for that individual. Again, it is about figuring out what gets you the results you are looking for.
 Some recipes suggest starting at a high degree of temperature for a specified period of time and then lowering the temperature to complete the cooking process. Other recipes suggest the opposite – starting at a lower temperature and then finishing at a higher temperature. The reason for the high-low, low-high combination when roasting a chicken is that the high temperature is about giving the chicken colour – getting it nicely brown and jump-starting the cooking process. The lowering of the temperature is to let the meat relax and cook through without losing a lot of moisture, creating tenderness.
I think that one of the trickiest parts of roasting a whole chicken, particularly for those not familiar with doing so, is knowing when it is finished.
There is no set time for the chicken to finish cooking, that determination will always be made based on the size of the chicken, the temperature at which it is being cooked and how your oven performs. Cooking with gas or electricity would vary the cooking time too.
The best way to test for done-ness is to insert a slender knife into the area between the breast and thigh to determine if the liquid runs clear. If the juice has any trace of pink, the chicken is not done, return it to the oven to continue cooking. There are others that will tell you to use a thermometer to test the internal temperature to determine whether or not the chicken is done. Go ahead if you are comfortable with that and if you have a trusted thermometer.
I have a friend who relies heavily on devices such as thermometers to determine the doneness of her roasts. Unfortunately, her thermometer almost always fails her – every time she checks it never reads that the meat is done and so she ends up overcooking everything. Out of sheer frustration, she avoids baking or roasting meats. You need to find a thermometer that reads temperature accurately and not necessarily an expensive one.
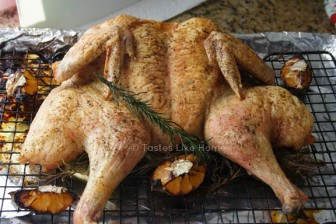
The cooking time for a chicken can be cut by at least 30 minutes if you opt to remove the spine of the chicken and spread the chicken flat. In other words, butterflying the chicken. Another term used for this method is called spatchcock. Many people find this a very easy way to a roast chicken and make thorough seasoning easier.
To butterfly/spatchcock a chicken, place it breast side down on a cutting surface, and using a sharp knife or kitchen shears, cut along the spine of the chicken – on either side of the neck coming all the way down to the butt. Pry open the chicken breaking the breastbone or turn the chicken skin side up and press firmly to break the wishbone. All this is in an effort to flatten the breast.
The pan
To rack or not to rack? Both work with benefits. Some roasting pans come with a metal rack that inserts into the pan. A rack can also refer to a wire rack or a metal cooling rack.
Roasting the chicken on a rack placed into the roasting/baking pan helps the heat to circulate all around the chicken. Hence the true roasting effect of the heat circulation. It also prevents the chicken from sticking to the bottom of the pan, warranting more clean up.
One of the other benefits of roasting on a rack is a mighty delicious one. Sliced potatoes or bread can be spread out at the bottom of the pan (beneath the rack) to catch and absorb all of the flavourful, seasoned juices from the chicken as it cooks! Right there you have a side dish to go along with your roast chicken.
Don’t have a rack? Not to worry, roast it directly on the pan. Or spread a bunch of herbs, cut some onions and carrots and rest the chicken on top and roast. Oh, and you don’t need a roasting pan, if all you have is a sheet pan (the one with a 1-inch lip all around) that’s fine too. Got a cast iron skillet? That will work too!
If you like, you can opt to roast your chicken in an oven bag. Just follow the instructions on the package. The one key thing here is to ensure that the pan in which you are roasting the chicken is at least 2-inches deep so that the edges of the bag do not hang over the pan as it puffs up while the chicken is cooking.
The drippings
Please, please do not throw away the drippings! There are multiple ways in which the drippings can be used – to make gravy, to roast potatoes or other root vegetables, to make a dirty rice or to bump up the flavour and taste of Rice and Peas, Cook-up Rice, soups, stews and sauces. Or better yet – to help make stuffing.
Carving and presentation
Once the chicken is done roasting, do not cut it up right away. It needs to rest so that the juices can redistribute and the meat relax. If you cut it right away, the chicken will be dry.
Remove the pan from the oven and get a generous piece of aluminum foil and tuck it around the chicken and let the chicken rest for at least 20 minutes before cutting into it. This is also referred to as tenting. Please note that the tenting results in the skin becoming moist and tender, however, if you wish the skin to remain crisp, let the chicken rest, uncovered.
When the resting period is over, turn the chicken upright so the juices trapped in the carcass and between the thighs can run into the pan with the drippings.
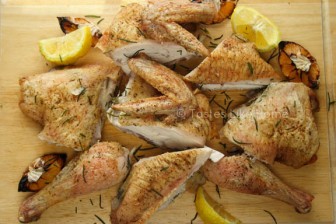
Cut up in the kitchen, assemble the pieces on a platter and then take it to the table or take the chicken whole to the table and carve it there – makes it a bit more dramatic and special. Personally, I prefer to cut up the chicken and assemble it on the platter – legs, thighs and wings at the sides, breast pieces in the middle, then take it to the table. I like the look of glee of people’s face as they as they ‘eye’ the pieces they want.
The thing about roast chicken is that it can be served with many things. Rice, potatoes, pasta, vegetables, ground provisions, beans, peas and noodles are all excellent accompaniments.
The leftovers

A roast chicken goes a long way. The breastbone, ribs and entire backbone can me made into soup or stock. However, if you’re like me, that will never happen because I look forward to chomping the bones.
Salads and sandwiches can be made with the leftovers. The meat can be cubed and cooked with vegetables.
The bottom line is this – find a method of preparing and cooking the chicken that is right and easy for you. I know this may sound frustrating but be patient.
I am offering you two methods of roasting a chicken – whole or butterflied. On different occasions, try both methods and determine which one is right for you. People look for different things in a roast chicken and that ranges from the appearance, to the taste, texture and flavour. It is for these reasons that there is so much information out there on the ‘best’ way to roast a chicken.
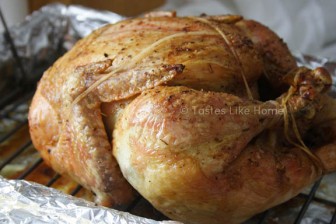
To conclude this 2-part series, I am sharing with you the method I use to roast a whole chicken. This is what works for me.
Cynthia’s Roast Chicken

This recipe requires overnight seasoning so plan ahead.
Please read the notes in detail before attempting recipe. The notes section indicates how to butterfly the chicken and roast it.
INGREDIENTS
1 whole chicken (4 – 5 lbs.)
Salt
2 – 3 tablespoons dry all-purpose seasoning
1 lemon
2 large onions, peeled and quartered
TOOLS & EQUIPMENT
Kitchen paper towels
1 (1 gallon zip plastic bag)
1 plate
Baking pan with rack
Kitchen string (about 3 ft)
Scissors
Aluminium foil
DIRECTIONS

Remove package from cavity that contains neck, liver and gizzards if it comes with your whole chicken when bought. Wash them, pat dry and place into a clean plastic bag and refrigerate for use the next day or freeze for use at another time. If the gizzard and livers are being used to stuff the cavity of the chicken, bring them up to room temperature the next day, clean them, season and set aside to stuff the cavity.
Rinse the chicken thoroughly, inside out a couple of times and stand upright to drain well. Pat dry all over with paper towels.
Add about 2 tablespoons of table salt to a bowl and set aside (you will not need this much salt but it’s better to have more so that half way through salting the chicken you don’t run short).

Sprinkle salt, liberally, into the cavity of the chicken – the bottom part by the backbone and as well as the top – the breast; you may need to flip the chicken over to ensure you’re hitting the right spots. Rest the chicken on its back and gently pry the skin of the breast away from the meat, be careful not to tear the skin. You will meet some resistance as you move to the centre of the breast, ignore that, the important thing is that you can access the meat on either side of the breast.
Lift the breast skin and rub salt on the meat getting into the thigh area as well. Turn the chicken with the legs pointing away from you, lift the skin of the breast and rub the meat with salt.
Turn the chicken onto its back and massage salt into the skin, turn the chicken over and do the same for the wings, legs and the skin on top of the breast. In other words, massage the chicken all over with salt. Don’t worry, the chicken will become wet as the salt melts.
Transfer the chicken to the zip bag, seal securely and place on the plate. Wash your hands and put the plate with the chicken in the refrigerator and leave it there overnight. This can be done a few hours ahead of cooking also, it does not have to be done overnight; work with the time you have.
Remove the chicken from the refrigerator 30 minutes before you are ready to cook it and bring it up to room temperature (this time may vary depending on how cold it is where you are).
Preheat the oven to 400 degrees F.
If you are using a rack, insert the rack into baking pan and set aside.
Remove the chicken from the bag, drain off the excess liquid and pat very dry – inside and out (do not rinse the chicken).
Season the chicken by sprinkling the all-purpose seasoning into the cavity, under the skin of the breast, between the thighs and the back. Rest the chicken on its back and season the wings, legs and the top skin of the breast.
Stuff the cavity with the liver, gizzard and neck if using, along with the onions and lemon.
Tie the drumsticks together with the kitchen string, cutting off the excess when you’re done tying, and tuck the tips of the wings towards the back of the chicken (tying up the chicken is optional, I do not always do it). If you know how to truss a chicken, go ahead and do so. Transfer the chicken to the pan and place on the rack; place in the oven and cook for 1 hour then reduce heat to 350 degrees and cook for another hour or until a knife when inserted to the inner thigh area results in the juices running clear; there should be no hint of pink.
Remove pan from oven and cover chicken with a large piece of foil, tucking it around the chicken. Let rest for at least 20 – 25 minutes before cutting the chicken.
NOTES
If using the neck, gizzards and liver, remove from the refrigerator the same time you are removing the chicken to bring up to room temperature. Season the neck, gizzards and liver with the all purpose seasoning and insert into the chicken cavity just before adding lemon and onions (see direction # 13).
Discard lemon and onions after removing from chicken, or, mince onions to add to sauce/gravy if making. A squirt or two of the lemon juice in the sauce/gravy will brighten up the flavour.
You can opt to serve the drippings with the roast chicken by spooning it over the cut up chicken or serve it in a gravy boat on the side.
To roast the chicken butterfly or spatchcock – remove the spine of the chicken, cutting from the bottom on one side up to the neck and the other side up to the neck. Spread the chicken out skin side up and press hard on the breast at the top (towards the neck) to break the wishbone. Don’t fuss if you can’t break the bone, this is only suggested to make the breast flatter. Proceed with the salting and seasoning as suggested in the recipe. To cook the chicken, for this recipe, I wanted the flavour or lemon and rosemary but you can use other fresh herbs such as thyme, tarragon, marjoram, sage, or oregano.
Cut the lemons into thin slices and spread in a square on the middle of the rack or directly on the roasting pan. Spread out bunches of the herbs all over the sliced lemon and then place the chicken skin side up over the herbs and lemon. Roast for 45 minutes at 400 degrees F and another 45 minutes at 350 degrees or until the juices from the thighs run clear.
Continue on to # 16 of the recipe.
Feel free to send along any questions you may still have, tips you want to share etc.
Cynthia
Cynthia@tasteslikehome.org
www.tasteslikehome.org


