Hi Everyone, For many of us Coconut Ice is very much a childhood treat. Wait, should I say, many of us of a particular age?! Yikes! Moving right along. While there was always the traditional brown sugar cake, there was something special about Coconut Ice with its pink and white colour combo, wonderfully scented with almond essence. Nary a church fair, school fair or fund raiser where Coconut Ice would not make an appearance.
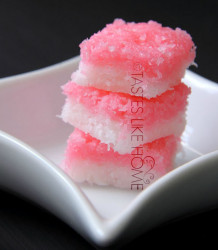
Coconut Ice, an ole-time candy – it is sweetened coconut that is somewhat like brown sugar cake, except that it is made with white sugar. Once mixed together, the coconut mixture is divided equally. One part remains white and the other part is tinted pink with a few drops of red food colouring. The uncoloured, white layer of coconut is spread at the bottom and the pink layer on top. The layered sweetened coconut is left to firm up and harden and then cut into squares. One of the things that sets Coconut Ice apart from brown sugar cake is not only the colours, but also, the brown outer ‘skin’ of the coconut is removed so that coconut ice is snowy white and perfectly pink. I think that the extra work of removing this ‘skin’ and the use of white sugar always meant that we paid more for Coconut Ice than we did for brown sugar cake.
 Just from the look of Coconut Ice, one felt that it was something difficult to make, and that it required special skills. I know I certainly felt that way. Perhaps I still do… Here’s what happened when I set out to make Coconut Ice.
First, I checked a well-known source of Guyanese recipes but when I read the ingredient list – 1 pound of sugar to 3 ounces of grated coconut, I immediately dismissed the recipe. There was no way I was going to use that much sugar with less than half a cup of coconut.
Next I checked online. There were lots of recipes as well as accompanying images of picture-perfect squares of pink and white Coconut Ice. All the recipes online required desiccated coconut (aka coconut flakes), powdered sugar (confectioner’s sugar/icing sugar) and condensed milk. I was a little puzzled because I thought Coconut Ice had to be cooked, not simply be mixed together and left to dry and harden. However, the best part of the recipes is that it takes about 10 to 15 minutes maximum to make the Coconut Ice. The hardest part was waiting for it to harden.
I can be ‘own way’ at times. I decided that there was no way I was going to use desiccated coconut, not when I have the real thing, fresh! So one Saturday morning I set about cracking a couple of coconuts, freeing the flesh from their hard shells and then removing the outer skin so that I could have my white coconut flesh. I sat down and patiently grated the coconut using a box grater to get that prized fine texture.

I mixed together the coconut with the powdered sugar and immediately noticed how wet the mixture was and decided to only add half a can of the condensed milk instead of the whole thing. Right away I knew that it was the use of the fresh coconut with its natural milk that yielded the extra moisture. My mixture was way too wet and I could not see my Coconut Ice firming up. Nevertheless, I pushed on. I divided the mixture, coloured half with a few drops of red food colouring and then set about layering the coconut mixture in a lined pan. I left the Coconut Ice to air dry from the early afternoon I made it to overnight. When I checked it in the morning, the top felt dry but the mixture was still soft. Not one to easily give up I had two decisions to make – what to do with this soft pink and white coconut mixture, and should I try making Coconut Ice again, using the grated coconut I had left over.
Perhaps foolishly, I felt I now had a handle on the problem, I would omit the condensed milk and only add the essence and just enough of the powdered sugar to sweeten and hold the coconut together.
One activity was going to take longer than the other so I opted to work on the quicker of the two tasks – make another batch of Coconut Ice. When I mixed the ingredients together, it still seemed a little too soft for my liking but I figured that it would most definitely firm up. I set it to air-dry overnight.
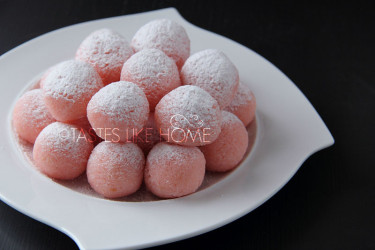
Meanwhile, I dumped the first batch of failed Coconut Ice into a heavy-bottomed pot and set it over medium low heat. I was planning to convert the mixture into Coconut Ladoo (laddu). Ladoo is an Indian confection; ball-shaped sweets that are made and served on festive and religious occasions. They can be made with a variety of ingredients such as bean/legume flours, grated coconut as well as dried fruits and nuts. From the photograph, you can see that I made my own kind of Coconut Ice – pink ladoo balls snow-capped with white powdered sugar. I shared these with friends and there was praise all around.
Back to attempt number 2 of the making of Coconut Ice.

After air-drying overnight, the Coconut Ice was firmer but not as firm as I would like or remembered it being, nevertheless, I cut it into soft squares. I could not believe that in order to get this thing right I was going to have to resort to buying desiccated coconut! Still not convinced that I would do so (buy the coconut flakes) and give this thing another try, I packed the squares into a container and put it in the refrigerator, thinking I’d figure out what to do with that later.
A couple of days later I took the container out of the refrigerator, opened it and attempted to take out one of the squares: lo and behold, the thing was hard and firm! What? Is that what I was supposed to do? Put it in the fridge to harden? Duh, did I feel stupid or what? I bit into the piece I took out and it was exactly as I remembered Coconut Ice being, in terms of the texture and the flavour. Did I do it? Did I make Coconut Ice? For me, the jury is still out because I am not sure if this is how the Coconut Ice of my childhood was made. I can’t help thinking that there was much more involved than just mixing together four ingredients and refrigerating it to harden. Was there really no cooking/heating involved?
If you know how the old-time Coconut Ice is/was made, please inbox me: Cynthia@tasteslikehome.org
Have a great holiday weekend!
Cynthia


